Building a contact form is one of the most essential elements for any website, yet many WordPress users struggle with creating one that looks professional and works reliably. In this comprehensive guide, we’ll walk you through creating a stunning contact form using only Elementor’s free features.
Why Your Website Needs a Professional Contact Form
A well-designed contact form is crucial for:
- Converting visitors into leads – Make it easy for potential customers to reach you
- Building trust – Professional forms signal credibility and reliability
- Organizing inquiries – Structured forms help you categorize and respond to messages efficiently
- Improving user experience – Clean, intuitive forms reduce bounce rates
What We’ll Build
By the end of this tutorial, you’ll have a professional contact form featuring:
- Clean, modern design that matches your brand
- Essential form fields (name, email, message)
- Proper styling and responsive layout
- Form validation and submission handling
- Thank you message functionality
Prerequisites
Before we start, ensure you have:
- WordPress website with admin access
- Elementor Free plugin installed and activated
- A contact form plugin (we’ll use WPForms Lite – free)
Step 1: Install and Set Up WPForms
First, we need a form plugin since Elementor Free doesn’t include form widgets.
1. Install WPForms Lite
Go to your WordPress admin dashboard
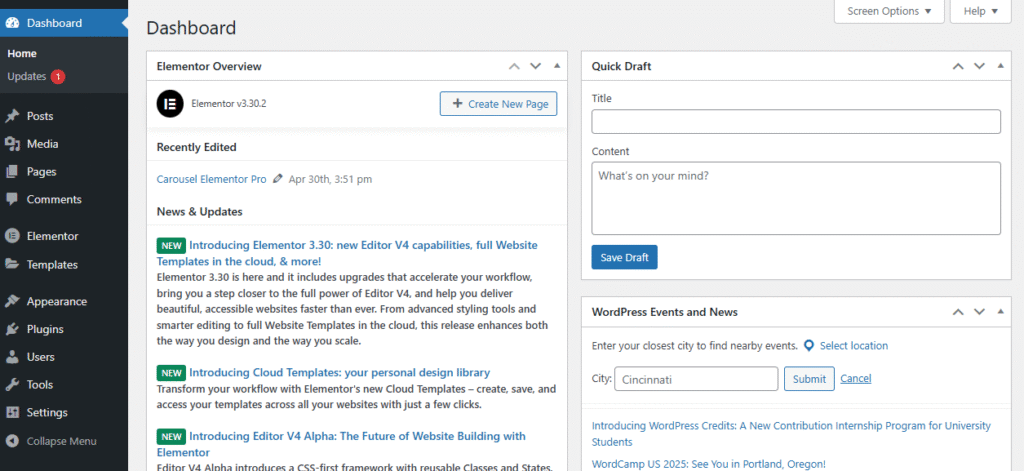
Navigate to Plugins → Add Plugin

Search for “WPForms”
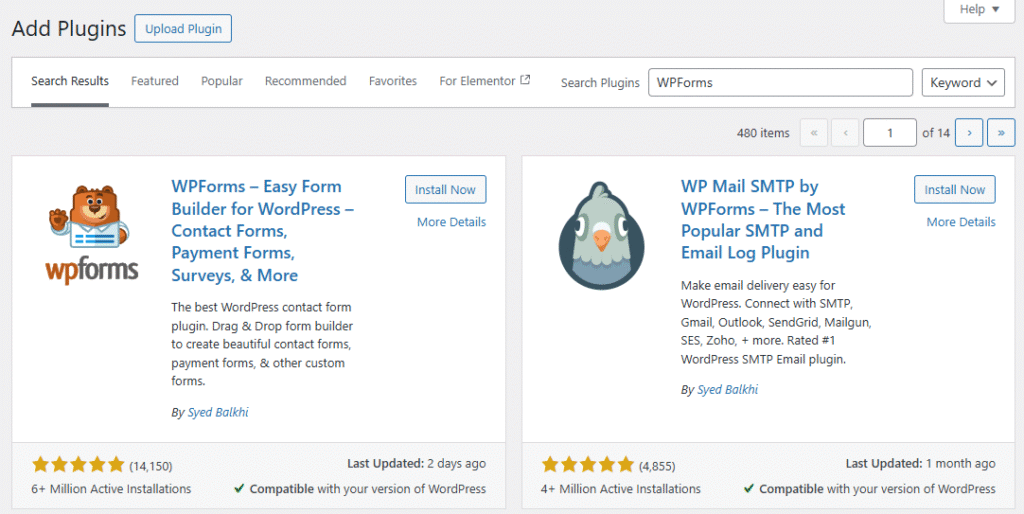
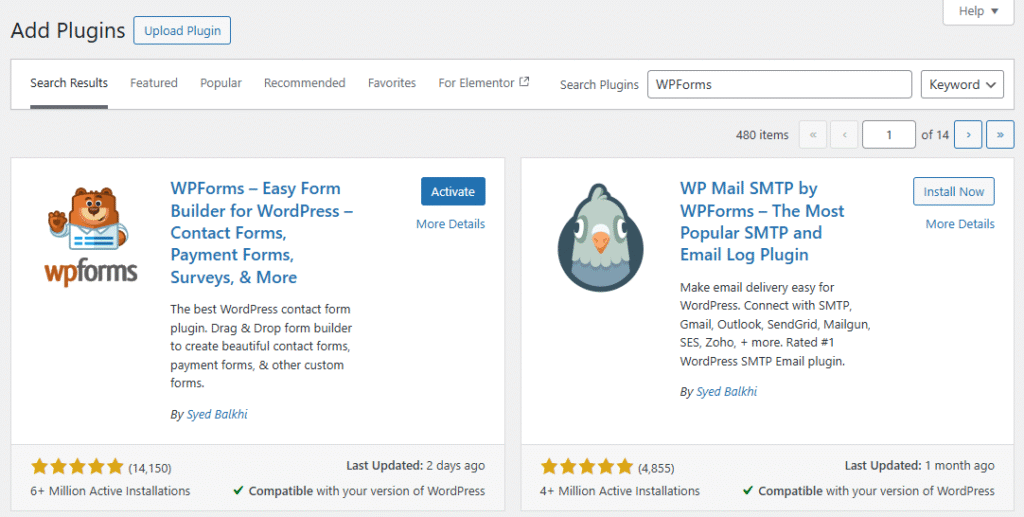
Install and activate WPForms Lite
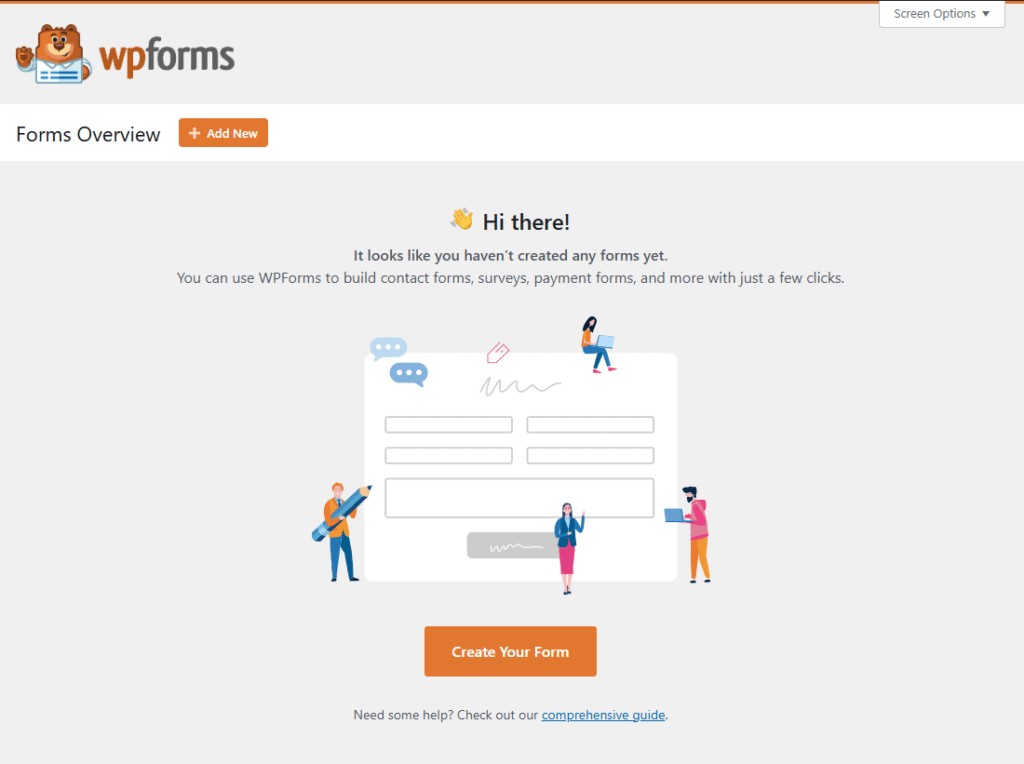
2. Create Your First Form
Go to WPForms → All Forms
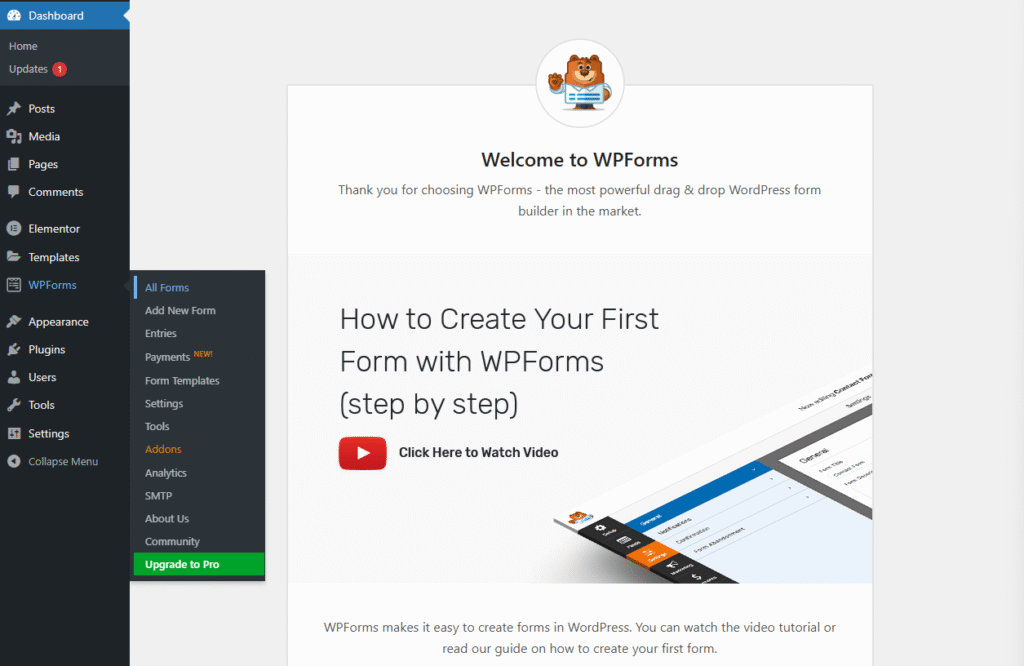
Click Add New
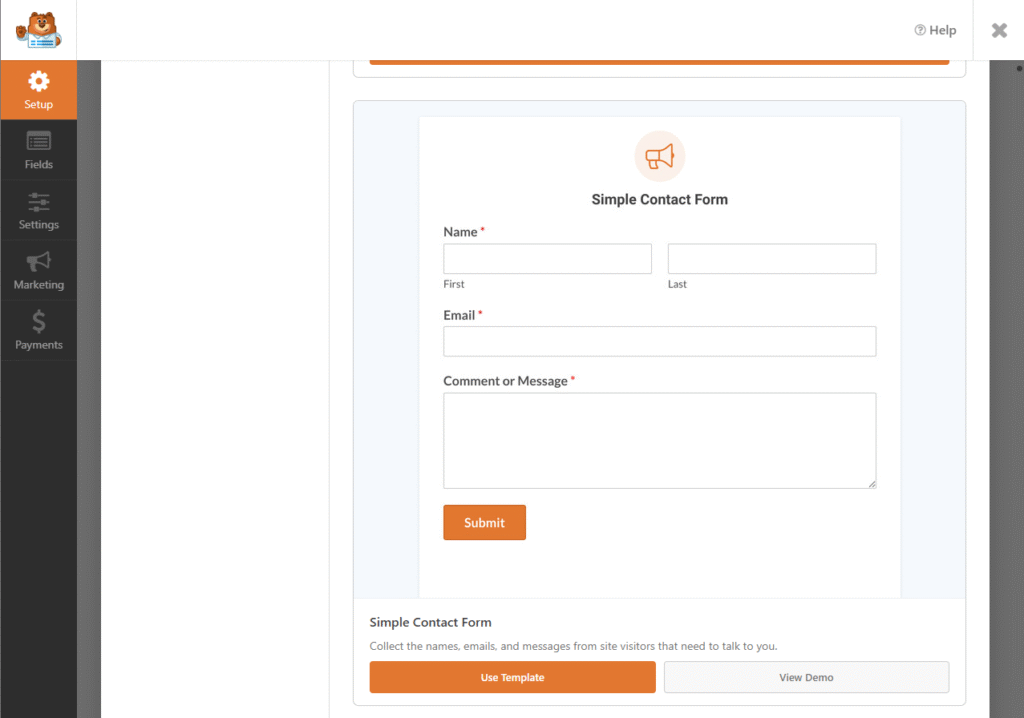
Choose Simple Contact Form template
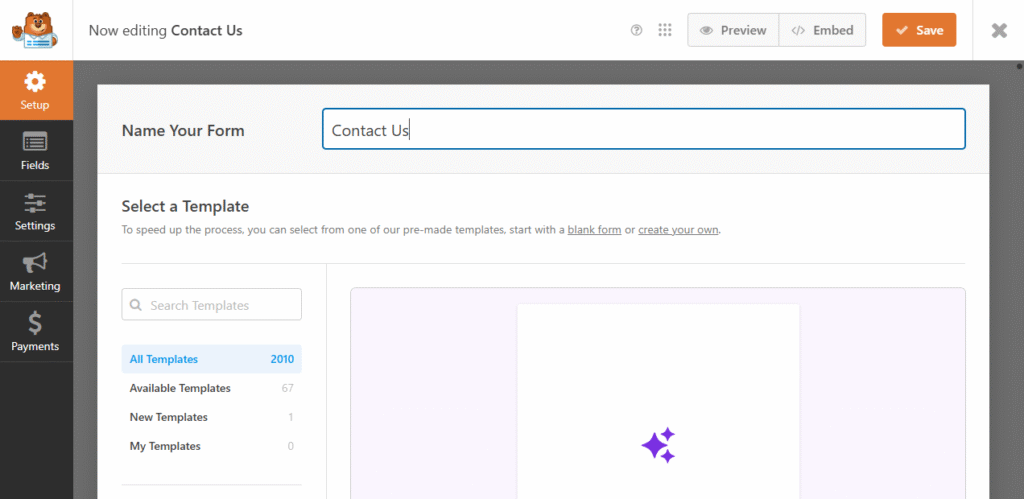
Name your form (e.g., “Contact Us”) and Click Save
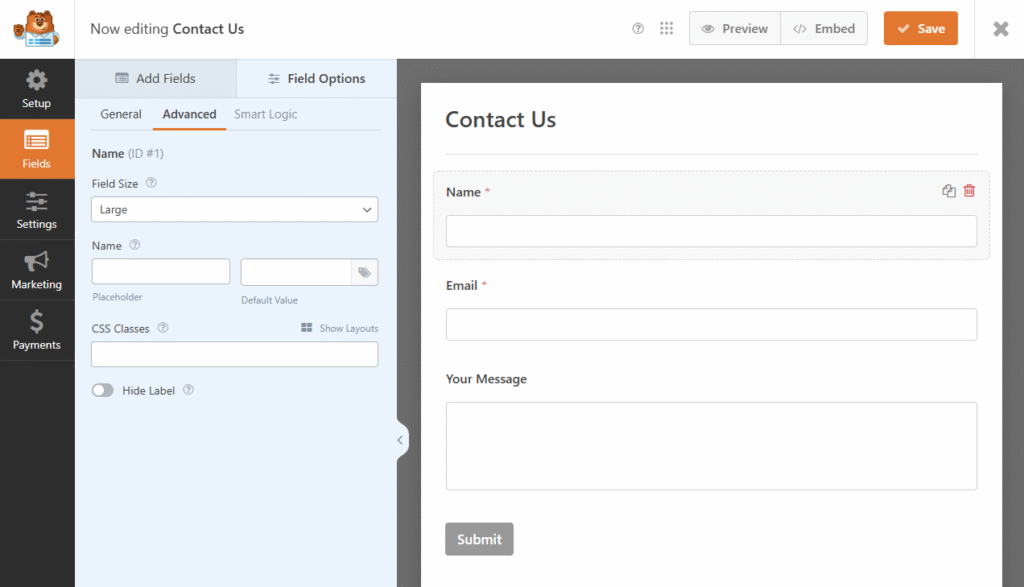
3. Customize Form Fields
- Name Field: Keep as required
- Email Field: Keep as required
- Comment or Message: Modify label to “Your Message”
- Click Save when done
Step 2: Create Your Contact Page
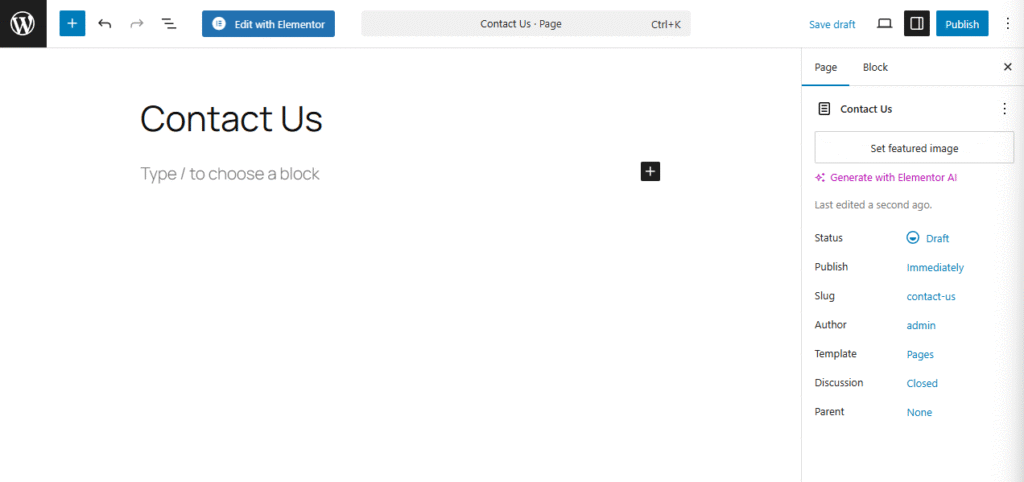
- Create New Page
- Go to Pages → Add New
- Title: “Contact Us”
- Click Edit with Elementor
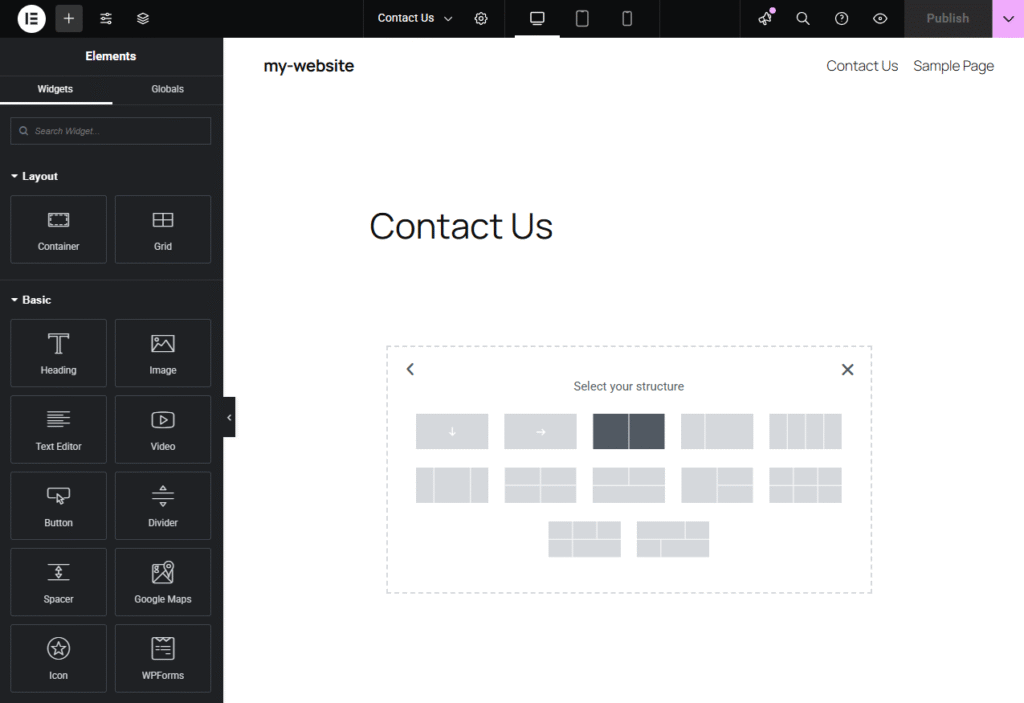
- Set Up Page Structure
- Delete default content
- Add Section widget
- Choose 2 columns layout
Step 3: Design the Left Column (Contact Info)
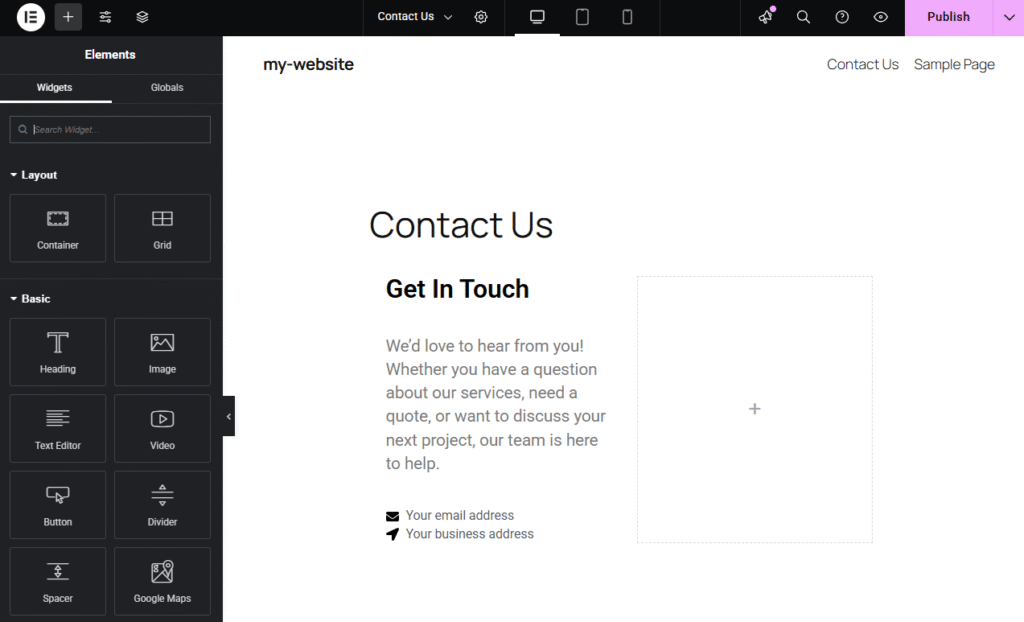
- Add Heading Widget
- Drag Heading widget to left column
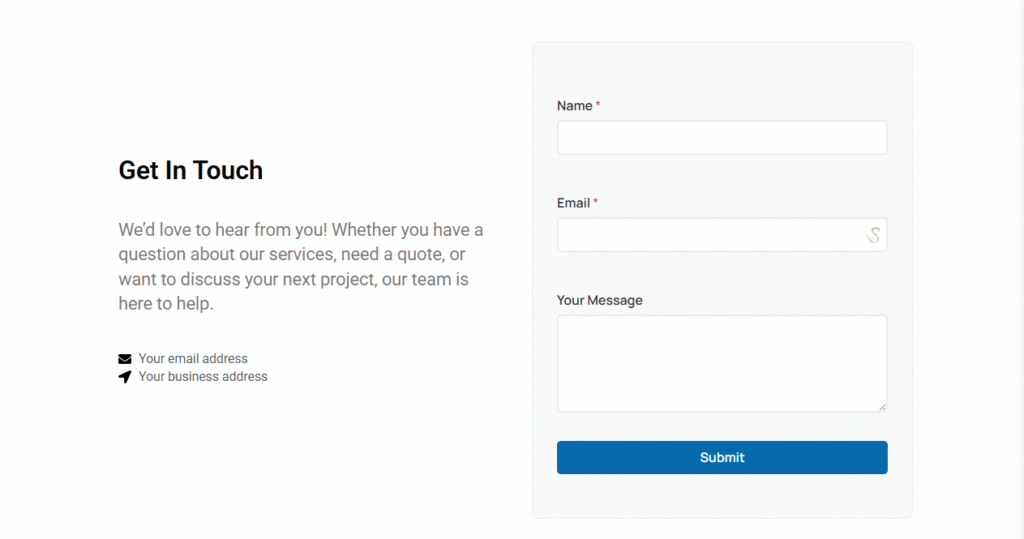
- Text: “Get In Touch”
- Tag: H2
- Style Tab:
- Color: Choose your brand color
- Typography: Bold, 32px
- Add Text Editor Widget
- Drag Text Editor below heading
- Add compelling copy: We’d love to hear from you! Whether you have a question about our services, need a quote, or want to discuss your next project, our team is here to help.
- Add Contact Information
- Icon List Widget for contact details
- Add items for:
- Email: Your email address
- Address: Your business address
- Style each icon:
- Icon size: 16px
- Icon color: Match your brand
- Text typography: 16px, readable font
Step 4: Design the Right Column (Contact Form)
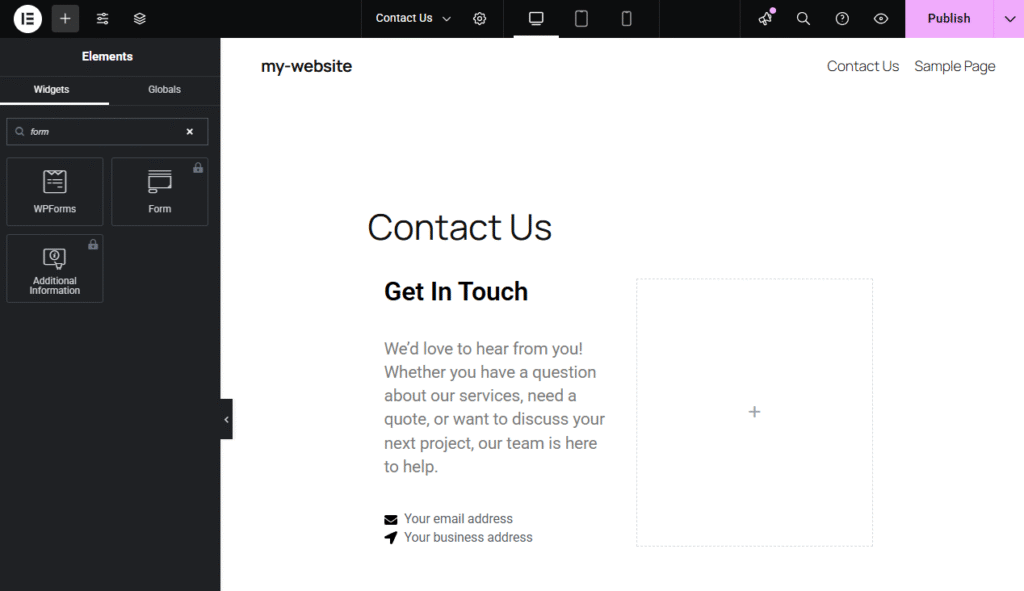
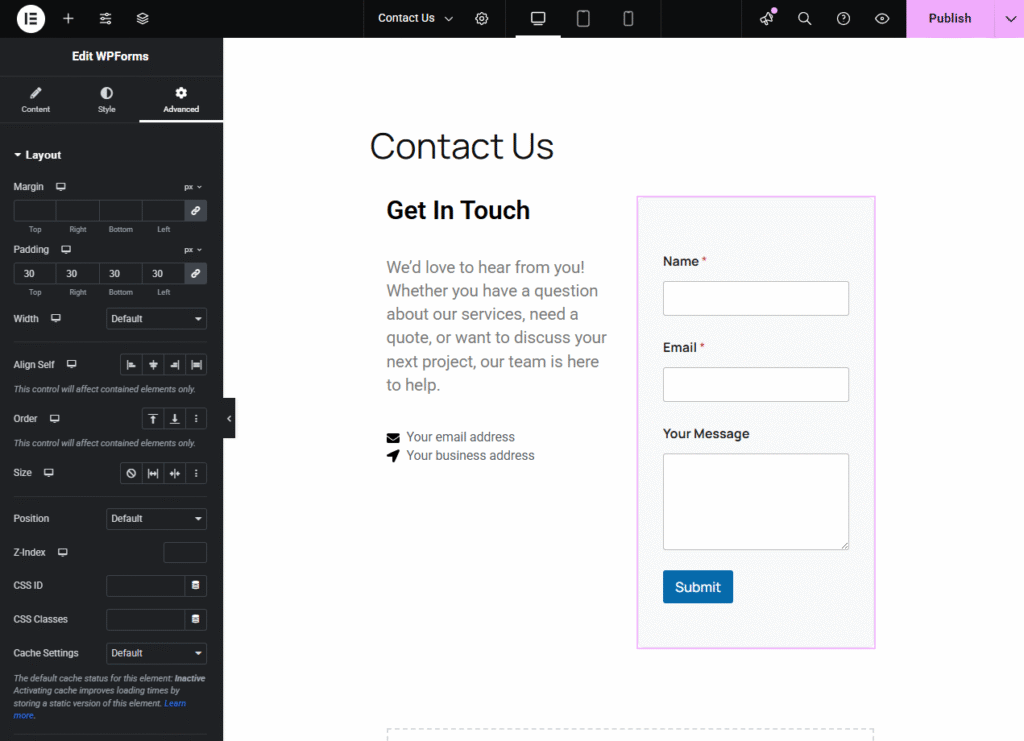
- Add WPForms Widget
- Type “WPForms” in the widgets search and drag the widget to the right column
- Style the Form Container
- Select the WPForms widget
- Advanced Tab → Background:
- Background Type: Classic
- Color: Light gray (#f8f9fa)
- Advanced Tab → Border:
- Border Type: Solid
- Width: 1px
- Color: Light gray (#e9ecef)
- Border Radius: 8px
- Advanced Tab → Padding:
- All sides: 30px
- All sides: 30px
Step 5: Advanced Styling with CSS
Since we’re using Elementor Free, we’ll add custom CSS for professional styling.
- Drag the HTML widget to right column
- Add This CSS Code:
<style>
    /* Contact Form Styling */
.wpforms-container {
    max-width: 100%;
}

.wpforms-form .wpforms-field.wpforms-field {
    margin-bottom: 20px;
}

.wpforms-form .wpforms-field > input[type="text"],
.wpforms-form .wpforms-field > input[type="email"],
.wpforms-form .wpforms-field > textarea {
    width: 100%;
    padding: 15px;
    border: 2px solid #e9ecef;
    border-radius: 5px;
    font-size: 16px;
    transition: border-color 0.3s ease;
}

.wpforms-form .wpforms-field > input:focus,
.wpforms-form .wpforms-field > textarea:focus {
    border-color: #007cba;
    outline: none;
    box-shadow: 0 0 0 3px rgba(0, 124, 186, 0.1);
}

.wpforms-form .wpforms-field-label.wpforms-field-label {
    font-weight: 600;
    margin-bottom: 8px;
    color: #333;
}

.wpforms-form .wpforms-submit.wpforms-submit {
    background-color: #007cba;
    color: white;
    width: 100%;
    border: none;
    border-radius: 5px;
    font-size: 16px;
    font-weight: 600;
    cursor: pointer;
    transition: background-color 0.3s ease;
}

.wpforms-form .wpforms-submit.wpforms-submit:hover {
    background-color: #005a87;
}

/* Responsive adjustments */
@media (max-width: 768px) {
    .elementor-section-wrap {
        padding: 20px;
    }
}
</style>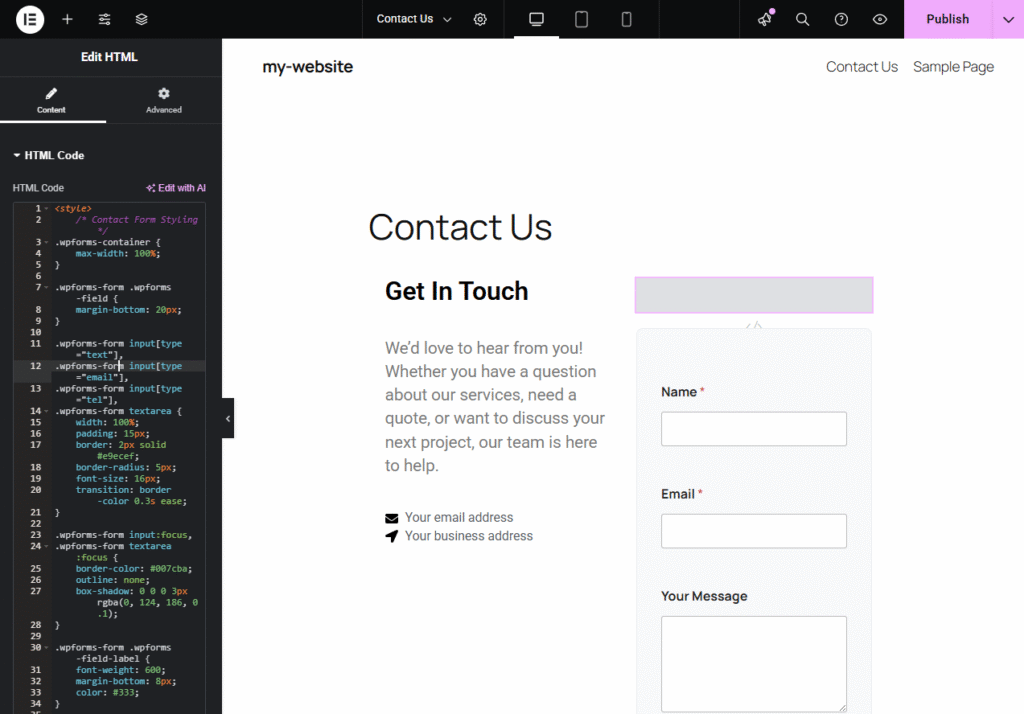
Step 6: Configure Form Settings
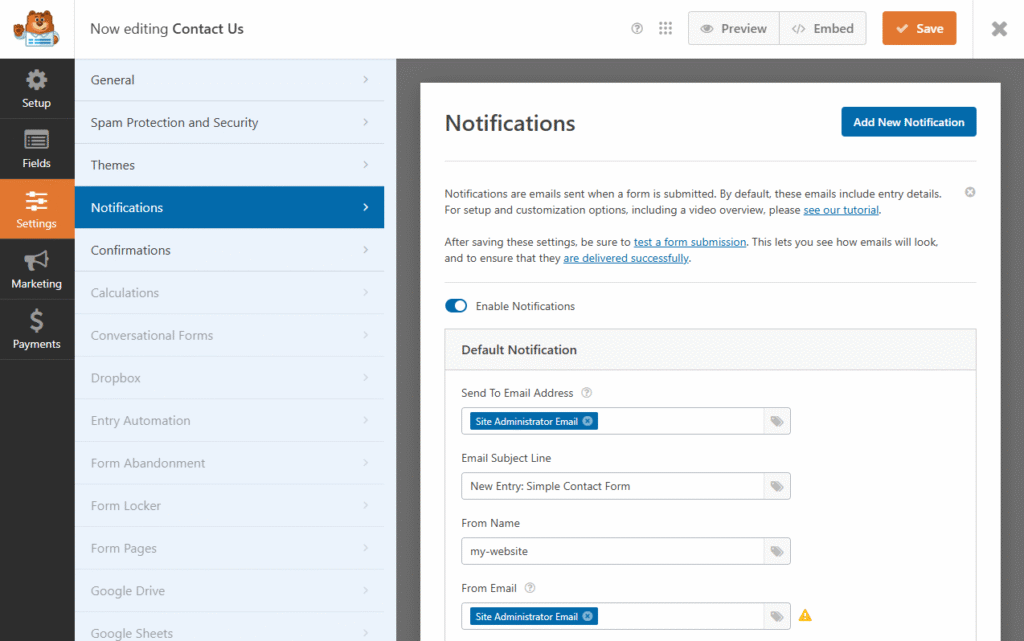
- Set Up Email Notifications
- Go to WPForms → All Forms
- Edit your contact form
- Click Settings → Notifications
- Send To Email: Your business email
- Email Subject: “New Contact Form Submission”
- Message: Include form fields using smart tags
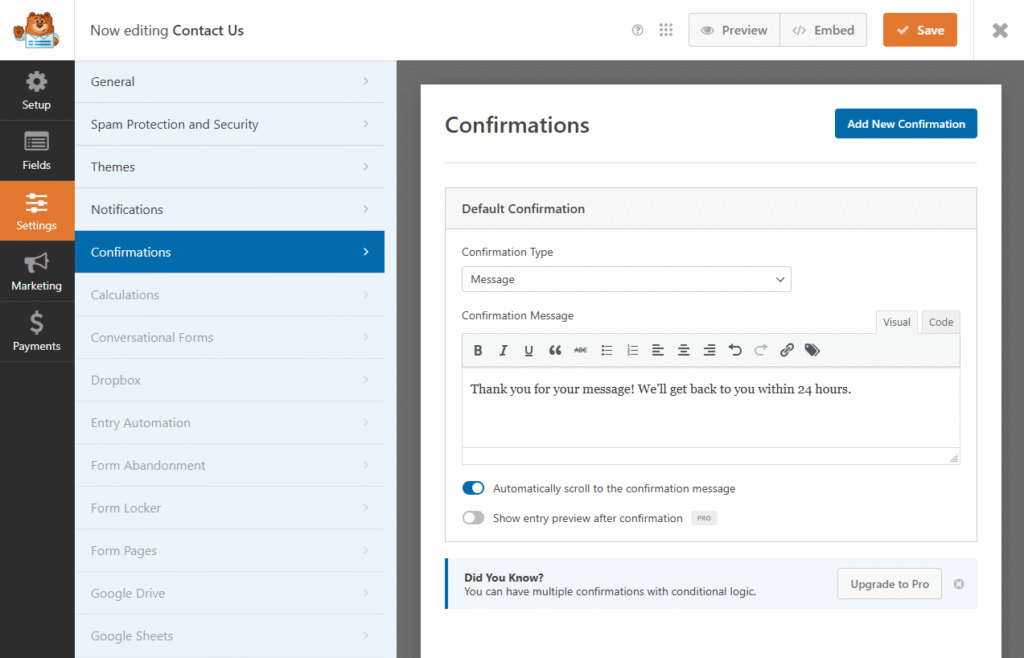
- Set Up Confirmation Message
- Go to Settings → Confirmations
- Type: Message
- Message: Thank you for your message! We’ll get back to you within 24 hours.
Step 7: Test Your Contact Form
- Preview Your Page
- Click Preview in Elementor
- Test the form with sample data
- Check email delivery
- Verify responsive design on mobile
- Common Issues and Fixes
- Form not submitting: Check WPForms settings
- Emails not sending: Install WP Mail SMTP plugin
- Styling issues: Clear cache and check CSS

Step 8: Mobile Optimization
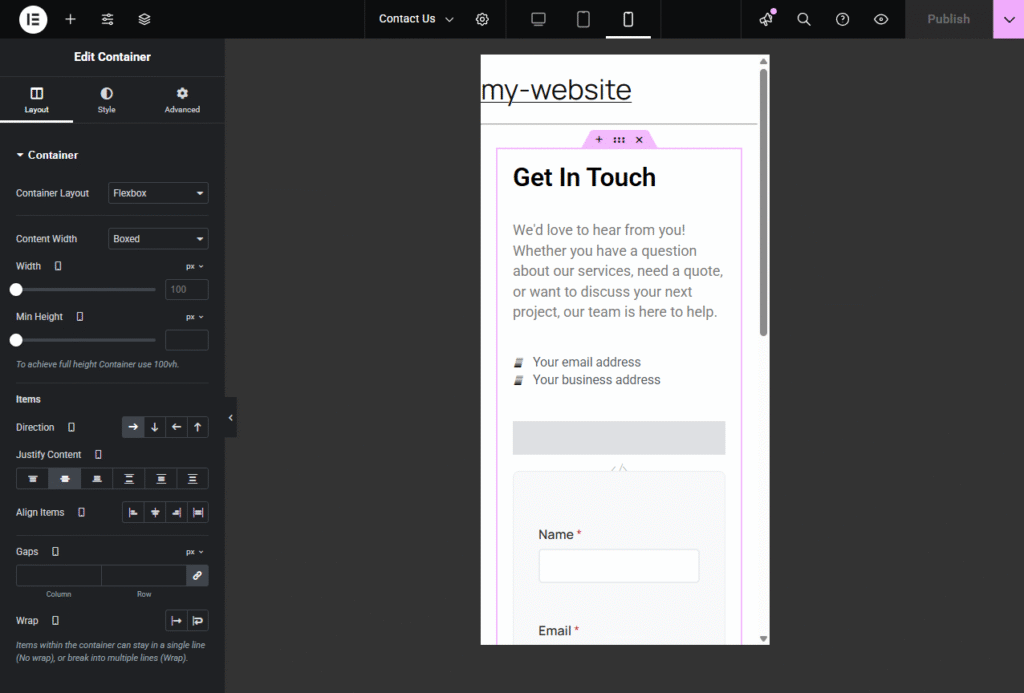
- Switch to Mobile View in Elementor
- Adjust Column Layout:
- Change to single column for mobile
- Reduce padding and margins
- Ensure text is readable
- Test Mobile Form:
- Form fields should be easily tappable
- Submit button should be prominent
- No horizontal scrolling
Pro Tips for Better Results
1. Improve Conversion Rates
- Keep forms short (3-5 fields maximum)
- Use clear, action-oriented submit button text
- Add trust signals (privacy policy link, security badges)
2. Enhance User Experience
- Add field validation messages
- Include progress indicators for longer forms
- Use placeholder text for guidance
3. Design Best Practices
- Maintain consistent spacing
- Use your brand colors throughout
- Ensure sufficient color contrast for accessibility
4. Performance Optimization
- Optimize images in your contact section
- Minimize plugin usage
- Use caching for better load times
Troubleshooting Common Issues
Problem: Form doesn’t display properly Solution: Check if WPForms is active and shortcode is correct
Problem: Emails not being received Solution: Configure SMTP settings or contact your hosting provider
Problem: Form looks different on mobile Solution: Add responsive CSS and test on actual devices
Problem: Spam submissions Solution: Enable reCAPTCHA in WPForms settings
Taking It Further
Once you’ve mastered this basic contact form, consider these enhancements:
- Multi-step forms for complex inquiries
- Conditional logic to show/hide fields
- File upload functionality for project briefs
- Integration with CRM systems for lead management
- A/B testing different form designs
Conclusion
Creating a professional contact form with Elementor Free is completely achievable with the right approach. The key is combining a reliable form plugin like WPForms with thoughtful design and custom CSS styling.
Remember that your contact form is often the first interaction potential customers have with your business. Make it count by ensuring it’s professional, functional, and aligned with your brand identity.


